알림
업데이트됨번역일: 2026년 9월 10일
이 페이지는 원문이 업데이트되어 번역이 갱신되었습니다.
- 원문 수정
- 2026년 9월 9일
- 번역 갱신
- 2026년 9월 10일
알림
- 소개
- 알림 생성하기
- 알림 보내기
- 메일 알림
- Markdown 메일 알림
- 데이터베이스 알림
- 브로드캐스트 알림
- SMS 알림
- Slack 알림
- 알림 현지화하기
- 테스트
- 알림 이벤트
- 커스텀 채널
소개
Laravel은 이메일 발송 기능 외에도, 이메일, SMS(Vonage, 옛 Nexmo), Slack 등 다양한 채널로 알림을 보낼 수 있는 기능을 지원합니다. 또한 웹 화면에 표시할 수 있도록 알림을 데이터베이스에 저장하는 알림 채널도 여러 개 제공되므로, 커뮤니티가 만든 다양한 채널 드라이버를 통해 원하는 방식으로 알림을 보낼 수 있습니다.
알림은 짧고 정보성 메시지 형태로, 애플리케이션에서 발생한 이벤트를 사용자에게 알려주는 용도로 사용합니다. 예를 들어 결제 관련 애플리케이션을 만든다면 "청구서 결제 완료" 알림을 이메일과 SMS 채널을 통해 사용자에게 보낼 수 있습니다.
NOTE
이 문서를 통해 알림을 직접 만들어보기 전에, Laravel이 제공하는 알림 스타터 킷들을 먼저 살펴보는 것도 좋습니다. 스타터 킷에는 이미 알림을 포함한 애플리케이션 스캐폴딩이 구성되어 있습니다.
알림
소개
Laravel은 이메일 전송 기능뿐 아니라, 이메일, SMS(Vonage, 예전 이름은 Nexmo), Slack 등 다양한 채널로 알림을 보낼 수 있는 기능도 제공합니다. 이 외에도 커뮤니티에서 만든 다양한 알림 채널이 존재해서, 수십 가지의 다른 채널로도 알림을 보낼 수 있습니다! 또한 알림을 데이터베이스에 저장해서 웹 화면에 표시할 수도 있습니다.
일반적으로 알림은 애플리케이션에서 발생한 어떤 일을 사용자에게 알려주는 짧고 간결한 안내 메시지여야 합니다. 예를 들어 결제 관련 애플리케이션을 만들고 있다면, "인보이스 결제 완료"라는 알림을 이메일과 SMS 채널을 통해 사용자에게 보낼 수 있습니다.
알림
알림 클래스 생성하기
Laravel에서 알림(notification)은 각각 하나의 클래스로 표현되며, 보통 app/Notifications 디렉터리에 저장됩니다. 아직 프로젝트에 이 디렉터리가 보이지 않더라도 걱정할 필요는 없습니다. make:notification Artisan 명령어를 실행하면 자동으로 생성됩니다:
php artisan make:notification InvoicePaid이 명령어를 실행하면 app/Notifications 디렉터리에 새로운 알림 클래스가 생성됩니다. 각 알림 클래스는 via 메서드와, toMail이나 toDatabase처럼 채널별로 알림 내용을 구성하는 여러 개의 메시지 빌드 메서드로 이루어져 있습니다.
NOTE
예를 들어 쇼핑몰 서비스라면 주문 완료, 결제 승인, 배송 시작 같은 이벤트마다 별도의 알림 클래스(OrderPlaced, PaymentConfirmed, OrderShipped 등)를 만들어 관리하는 것이 일반적입니다. 각 클래스는 이메일, SMS, 데이터베이스 알림 등 원하는 채널로 자유롭게 전송할 수 있습니다.
알림 보내기
Notifiable 트레이트 사용하기
알림을 보내는 방법은 두 가지입니다. Notifiable 트레이트가 제공하는 notify 메서드를 사용하는 방법과, Notification 파사드를 사용하는 방법입니다. Notifiable 트레이트는 기본적으로 애플리케이션의 App\Models\User 모델에 이미 포함되어 있습니다.
<?php

namespace App\Models;

use Illuminate\Foundation\Auth\User as Authenticatable;
use Illuminate\Notifications\Notifiable;

class User extends Authenticatable
{
    use Notifiable;
}
이 트레이트가 제공하는 notify 메서드는 알림 인스턴스를 인자로 받습니다.
use App\Notifications\InvoicePaid;

$user->notify(new InvoicePaid($invoice));
NOTE
Notifiable 트레이트는 User 모델뿐 아니라 어떤 모델에도 자유롭게 사용할 수 있습니다. 알림을 보낼 필요가 있는 모델이라면 어디든 추가해도 됩니다. 예를 들어 Order 모델이나 Team 모델에 이 트레이트를 추가해서 알림을 보낼 수도 있습니다.
Notification 파사드 사용하기
Notification 파사드를 이용해 알림을 보낼 수도 있습니다. 이 방식은 여러 사용자 목록처럼 다수의 대상에게 한 번에 알림을 보내야 할 때 유용합니다. 파사드를 사용해 알림을 보내려면, 알림을 받을 대상들과 알림 인스턴스를 send 메서드에 전달하면 됩니다.
use Illuminate\Support\Facades\Notification;

Notification::send($users, new InvoicePaid($invoice));
sendNow 메서드를 사용하면 알림을 즉시 전송할 수 있습니다. 이 메서드는 알림 클래스가 ShouldQueue 인터페이스를 구현하고 있더라도 큐에 넣지 않고 즉시 발송합니다.
Notification::sendNow($developers, new DeploymentCompleted($deployment));알림 전송 채널 지정하기
모든 알림 클래스는 via 메서드를 가지며, 이 메서드가 해당 알림이 어떤 채널로 전송될지 결정합니다. 알림은 mail, database, broadcast, vonage, slack 채널을 통해 보낼 수 있습니다.
NOTE
Telegram이나 Pusher 같은 다른 채널을 사용하고 싶다면, 커뮤니티에서 운영하는 Laravel Notification Channels 웹사이트를 참고해 보세요.
via 메서드는 알림을 받을 대상 인스턴스인 $notifiable을 인자로 받습니다. 이를 활용해 대상에 따라 전송 채널을 다르게 지정할 수 있습니다.
/**
 * 알림의 전송 채널을 반환합니다.
 *
 * @return array<int, string>
 */
public function via(object $notifiable): array
{
    return $notifiable->prefers_sms ? ['vonage'] : ['mail', 'database'];
}
알림 큐잉하기
WARNING
알림을 큐에 넣기 전에, 큐 설정을 마치고 워커를 실행해 두어야 합니다.
알림 전송은 시간이 걸릴 수 있습니다. 특히 외부 API를 호출해야 하는 채널이라면 더욱 그렇습니다. 애플리케이션의 응답 속도를 높이려면, 알림 클래스에 ShouldQueue 인터페이스와 Queueable 트레이트를 추가해서 큐에 넣도록 만들 수 있습니다. make:notification 명령어로 생성된 알림 클래스에는 이미 이 인터페이스와 트레이트가 임포트되어 있으므로 바로 적용할 수 있습니다.
<?php

namespace App\Notifications;

use Illuminate\Bus\Queueable;
use Illuminate\Contracts\Queue\ShouldQueue;
use Illuminate\Notifications\Notification;

class InvoicePaid extends Notification implements ShouldQueue
{
    use Queueable;

    // ...
}
ShouldQueue 인터페이스를 추가한 뒤에는 평소처럼 알림을 보내면 됩니다. Laravel이 이 인터페이스를 감지해서 알림 전송을 자동으로 큐에 등록합니다.
$user->notify(new InvoicePaid($invoice));알림을 큐에 넣으면, 수신자와 채널의 조합마다 각각 별도의 큐 작업(Job)이 생성됩니다. 예를 들어 수신자가 3명이고 채널이 2개라면, 총 6개의 Job이 큐에 등록됩니다.
알림 전송 지연시키기
알림 전송을 지연시키고 싶다면, 알림 인스턴스를 생성할 때 delay 메서드를 체이닝하면 됩니다.
$delay = now()->plus(minutes: 10);

$user->notify((new InvoicePaid($invoice))->delay($delay));
delay 메서드에 배열을 전달하면 채널별로 지연 시간을 다르게 지정할 수도 있습니다.
$user->notify((new InvoicePaid($invoice))->delay([
    'mail' => now()->plus(minutes: 5),
    'sms' => now()->plus(minutes: 10),
]));
또는 알림 클래스 안에 withDelay 메서드를 정의해도 됩니다. 이 메서드는 채널 이름과 지연 시간 값을 담은 배열을 반환해야 합니다.
/**
 * 알림의 전송 지연 시간을 결정합니다.
 *
 * @return array<string, \Illuminate\Support\Carbon>
 */
public function withDelay(object $notifiable): array
{
    return [
        'mail' => now()->plus(minutes: 5),
        'sms' => now()->plus(minutes: 10),
    ];
}
알림 큐 커넥션 커스터마이징하기
기본적으로 큐에 등록되는 알림은 애플리케이션의 기본 큐 커넥션을 사용합니다. 특정 알림에 대해 다른 커넥션을 사용하고 싶다면, 알림 클래스의 생성자에서 onConnection 메서드를 호출하면 됩니다.
<?php

namespace App\Notifications;

use Illuminate\Bus\Queueable;
use Illuminate\Contracts\Queue\ShouldQueue;
use Illuminate\Notifications\Notification;

class InvoicePaid extends Notification implements ShouldQueue
{
    use Queueable;

    /**
     * 새로운 알림 인스턴스를 생성합니다.
     */
    public function __construct()
    {
        $this->onConnection('redis');
    }
}
만약 알림이 지원하는 채널마다 서로 다른 큐 커넥션을 지정하고 싶다면, 알림 클래스에 viaConnections 메서드를 정의하면 됩니다. 이 메서드는 채널 이름과 큐 커넥션 이름의 쌍으로 이루어진 배열을 반환해야 합니다.
/**
 * 각 알림 채널에 사용할 커넥션을 결정합니다.
 *
 * @return array<string, string>
 */
public function viaConnections(): array
{
    return [
        'mail' => 'redis',
        'database' => 'sync',
    ];
}
알림 채널별 큐 커스터마이징하기
알림이 지원하는 채널마다 서로 다른 큐를 사용하고 싶다면, 알림 클래스에 viaQueues 메서드를 정의하면 됩니다. 이 메서드는 채널 이름과 큐 이름의 쌍으로 이루어진 배열을 반환해야 합니다.
/**
 * 각 알림 채널에 사용할 큐를 결정합니다.
 *
 * @return array<string, string>
 */
public function viaQueues(): array
{
    return [
        'mail' => 'mail-queue',
        'slack' => 'slack-queue',
    ];
}
큐잉된 알림 Job 속성 커스터마이징하기
알림 클래스에 큐 관련 속성(attribute)을 정의하면, 알림 전송을 담당하는 내부 큐 작업의 동작을 커스터마이징할 수 있습니다. 이 속성들은 알림을 보내는 큐 작업에 그대로 상속됩니다.
<?php

namespace App\Notifications;

use Illuminate\Bus\Queueable;
use Illuminate\Contracts\Queue\ShouldQueue;
use Illuminate\Notifications\Notification;
use Illuminate\Queue\Attributes\FailOnTimeout;
use Illuminate\Queue\Attributes\MaxExceptions;
use Illuminate\Queue\Attributes\Timeout;
use Illuminate\Queue\Attributes\Tries;

#[Tries(5)]
#[Timeout(120)]
#[MaxExceptions(3)]
#[FailOnTimeout]
class InvoicePaid extends Notification implements ShouldQueue
{
    use Queueable;

    // ...
}
큐에 등록된 알림 데이터의 기밀성과 무결성을 암호화를 통해 보장하고 싶다면, 알림 클래스에 ShouldBeEncrypted 인터페이스를 추가하면 됩니다.
<?php

namespace App\Notifications;

use Illuminate\Bus\Queueable;
use Illuminate\Contracts\Queue\ShouldBeEncrypted;
use Illuminate\Contracts\Queue\ShouldQueue;
use Illuminate\Notifications\Notification;

class InvoicePaid extends Notification implements ShouldQueue, ShouldBeEncrypted
{
    use Queueable;

    // ...
}
이러한 속성을 알림 클래스에 직접 정의하는 것 외에도, backoff와 retryUntil 메서드를 정의해서 큐 작업의 재시도 대기 전략과 재시도 제한 시간을 지정할 수도 있습니다.
use DateTime;

/**
 * 알림 재시도 전 대기할 초 단위 시간을 계산합니다.
 */
public function backoff(): int
{
    return 3;
}

/**
 * 알림이 타임아웃되는 시각을 결정합니다.
 */
public function retryUntil(): DateTime
{
    return now()->plus(minutes: 5);
}
NOTE
이러한 Job 속성과 메서드에 대한 자세한 내용은 큐 작업 문서를 참고하세요.
큐잉된 알림의 미들웨어
큐 작업과 마찬가지로, 큐에 등록되는 알림도 미들웨어를 정의할 수 있습니다. 알림 클래스에 middleware 메서드를 정의하면 됩니다. 이 메서드는 $notifiable과 $channel 변수를 인자로 받으므로, 알림이 전송되는 대상과 채널에 따라 반환할 미들웨어를 다르게 지정할 수 있습니다.
use Illuminate\Queue\Middleware\RateLimited;

/**
 * 알림 Job이 통과할 미들웨어를 반환합니다.
 *
 * @return array<int, object>
 */
public function middleware(object $notifiable, string $channel)
{
    return match ($channel) {
        'mail' => [new RateLimited('postmark')],
        'slack' => [new RateLimited('slack')],
        default => [],
    };
}
큐잉된 알림과 데이터베이스 트랜잭션
데이터베이스 트랜잭션 안에서 큐잉된 알림을 디스패치하면, 트랜잭션이 커밋되기 전에 큐 워커가 해당 작업을 먼저 처리해 버릴 수 있습니다. 이 경우 트랜잭션 안에서 변경한 모델이나 레코드가 아직 데이터베이스에 반영되지 않았을 수 있고, 트랜잭션 내에서 새로 생성한 모델이나 레코드는 아예 존재하지 않을 수도 있습니다. 알림이 이런 모델에 의존한다면, 알림 전송 Job이 처리될 때 예기치 않은 오류가 발생할 수 있습니다.
큐 커넥션의 after_commit 설정 값이 false로 되어 있더라도, 특정 알림만큼은 모든 열린 트랜잭션이 커밋된 후에 디스패치되도록 지정하고 싶다면, 알림을 보낼 때 afterCommit 메서드를 호출하면 됩니다.
use App\Notifications\InvoicePaid;

$user->notify((new InvoicePaid($invoice))->afterCommit());
또는 알림 클래스의 생성자에서 afterCommit 메서드를 호출해도 됩니다.
<?php

namespace App\Notifications;

use Illuminate\Bus\Queueable;
use Illuminate\Contracts\Queue\ShouldQueue;
use Illuminate\Notifications\Notification;

class InvoicePaid extends Notification implements ShouldQueue
{
    use Queueable;

    /**
     * 새로운 알림 인스턴스를 생성합니다.
     */
    public function __construct()
    {
        $this->afterCommit();
    }
}
NOTE
이런 문제를 우회하는 방법에 대해 더 알고 싶다면 큐 작업과 데이터베이스 트랜잭션 문서를 참고하세요.
큐잉된 알림을 실제로 전송할지 결정하기
큐잉된 알림이 백그라운드 처리를 위해 큐에 디스패치되고 나면, 보통 큐 워커가 이를 받아 처리해서 원래 의도한 수신자에게 전송합니다.
하지만 큐 워커가 처리하는 시점에 알림을 실제로 보낼지 최종적으로 판단하고 싶다면, 알림 클래스에 shouldSend 메서드를 정의하면 됩니다. 이 메서드가 false를 반환하면 해당 알림은 전송되지 않습니다.
/**
 * 알림을 전송할지 여부를 결정합니다.
 */
public function shouldSend(object $notifiable, string $channel): bool
{
    return $this->invoice->isPaid();
}
알림 전송 후 처리하기
알림이 전송된 뒤 추가 작업을 실행하고 싶다면, 알림 클래스에 afterSending 메서드를 정의하면 됩니다. 이 메서드는 알림 대상, 채널 이름, 그리고 해당 채널의 응답 값을 인자로 받습니다.
/**
 * 알림 전송 후 처리 로직입니다.
 */
public function afterSending(object $notifiable, string $channel, mixed $response): void
{
    // ...
}
온디맨드 알림
애플리케이션의 "사용자"로 저장되어 있지 않은 대상에게 알림을 보내야 할 때도 있습니다. 예를 들어 아직 회원가입 하지 않은 잠재 고객의 이메일 주소로 알림을 보내는 경우입니다. Notification 파사드의 route 메서드를 사용하면, 알림을 보내기 전에 임시로 라우팅 정보를 지정할 수 있습니다.
use Illuminate\Broadcasting\Channel;
use Illuminate\Support\Facades\Notification;

Notification::route('mail', 'taylor@example.com')
    ->route('vonage', '5555555555')
    ->route('slack', '#slack-channel')
    ->route('broadcast', [new Channel('channel-name')])
    ->notify(new InvoicePaid($invoice));
온디맨드 알림을 mail 라우트로 보낼 때 수신자의 이름도 함께 지정하고 싶다면, 이메일 주소를 키로, 이름을 값으로 갖는 배열의 첫 번째 요소로 전달하면 됩니다.
Notification::route('mail', [
    'barrett@example.com' => 'Barrett Blair',
])->notify(new InvoicePaid($invoice));
routes 메서드를 사용하면 여러 채널에 대한 임시 라우팅 정보를 한 번에 지정할 수도 있습니다.
Notification::routes([
    'mail' => ['barrett@example.com' => 'Barrett Blair'],
    'vonage' => '5555555555',
])->notify(new InvoicePaid($invoice));
이메일 알림
메일 메시지 포맷하기
알림을 이메일로 전송하고 싶다면 알림 클래스에 toMail 메서드를 정의해야 합니다. 이 메서드는 $notifiable 엔터티를 인자로 받고, Illuminate\Notifications\Messages\MailMessage 인스턴스를 반환해야 합니다.
MailMessage 클래스는 트랜잭션 이메일(결제 완료, 비밀번호 재설정 등 특정 이벤트에 대응해 발송되는 이메일)을 손쉽게 작성할 수 있도록 몇 가지 간단한 메서드를 제공합니다. 메일 메시지에는 텍스트 줄과 "call to action" 버튼을 담을 수 있습니다. 다음은 toMail 메서드의 예시입니다.
/**
 * Get the mail representation of the notification.
 */
public function toMail(object $notifiable): MailMessage
{
    $url = url('/invoice/'.$this->invoice->id);

    return (new MailMessage)
        ->greeting('Hello!')
        ->line('One of your invoices has been paid!')
        ->lineIf($this->amount > 0, "Amount paid: {$this->amount}")
        ->action('View Invoice', $url)
        ->line('Thank you for using our application!');
}
NOTE
위 예제에서 toMail 메서드 안에 $this->invoice->id를 사용한 점을 눈여겨보세요. 알림 메시지를 생성하는 데 필요한 데이터는 무엇이든 알림 클래스의 생성자에 전달해 사용할 수 있습니다.
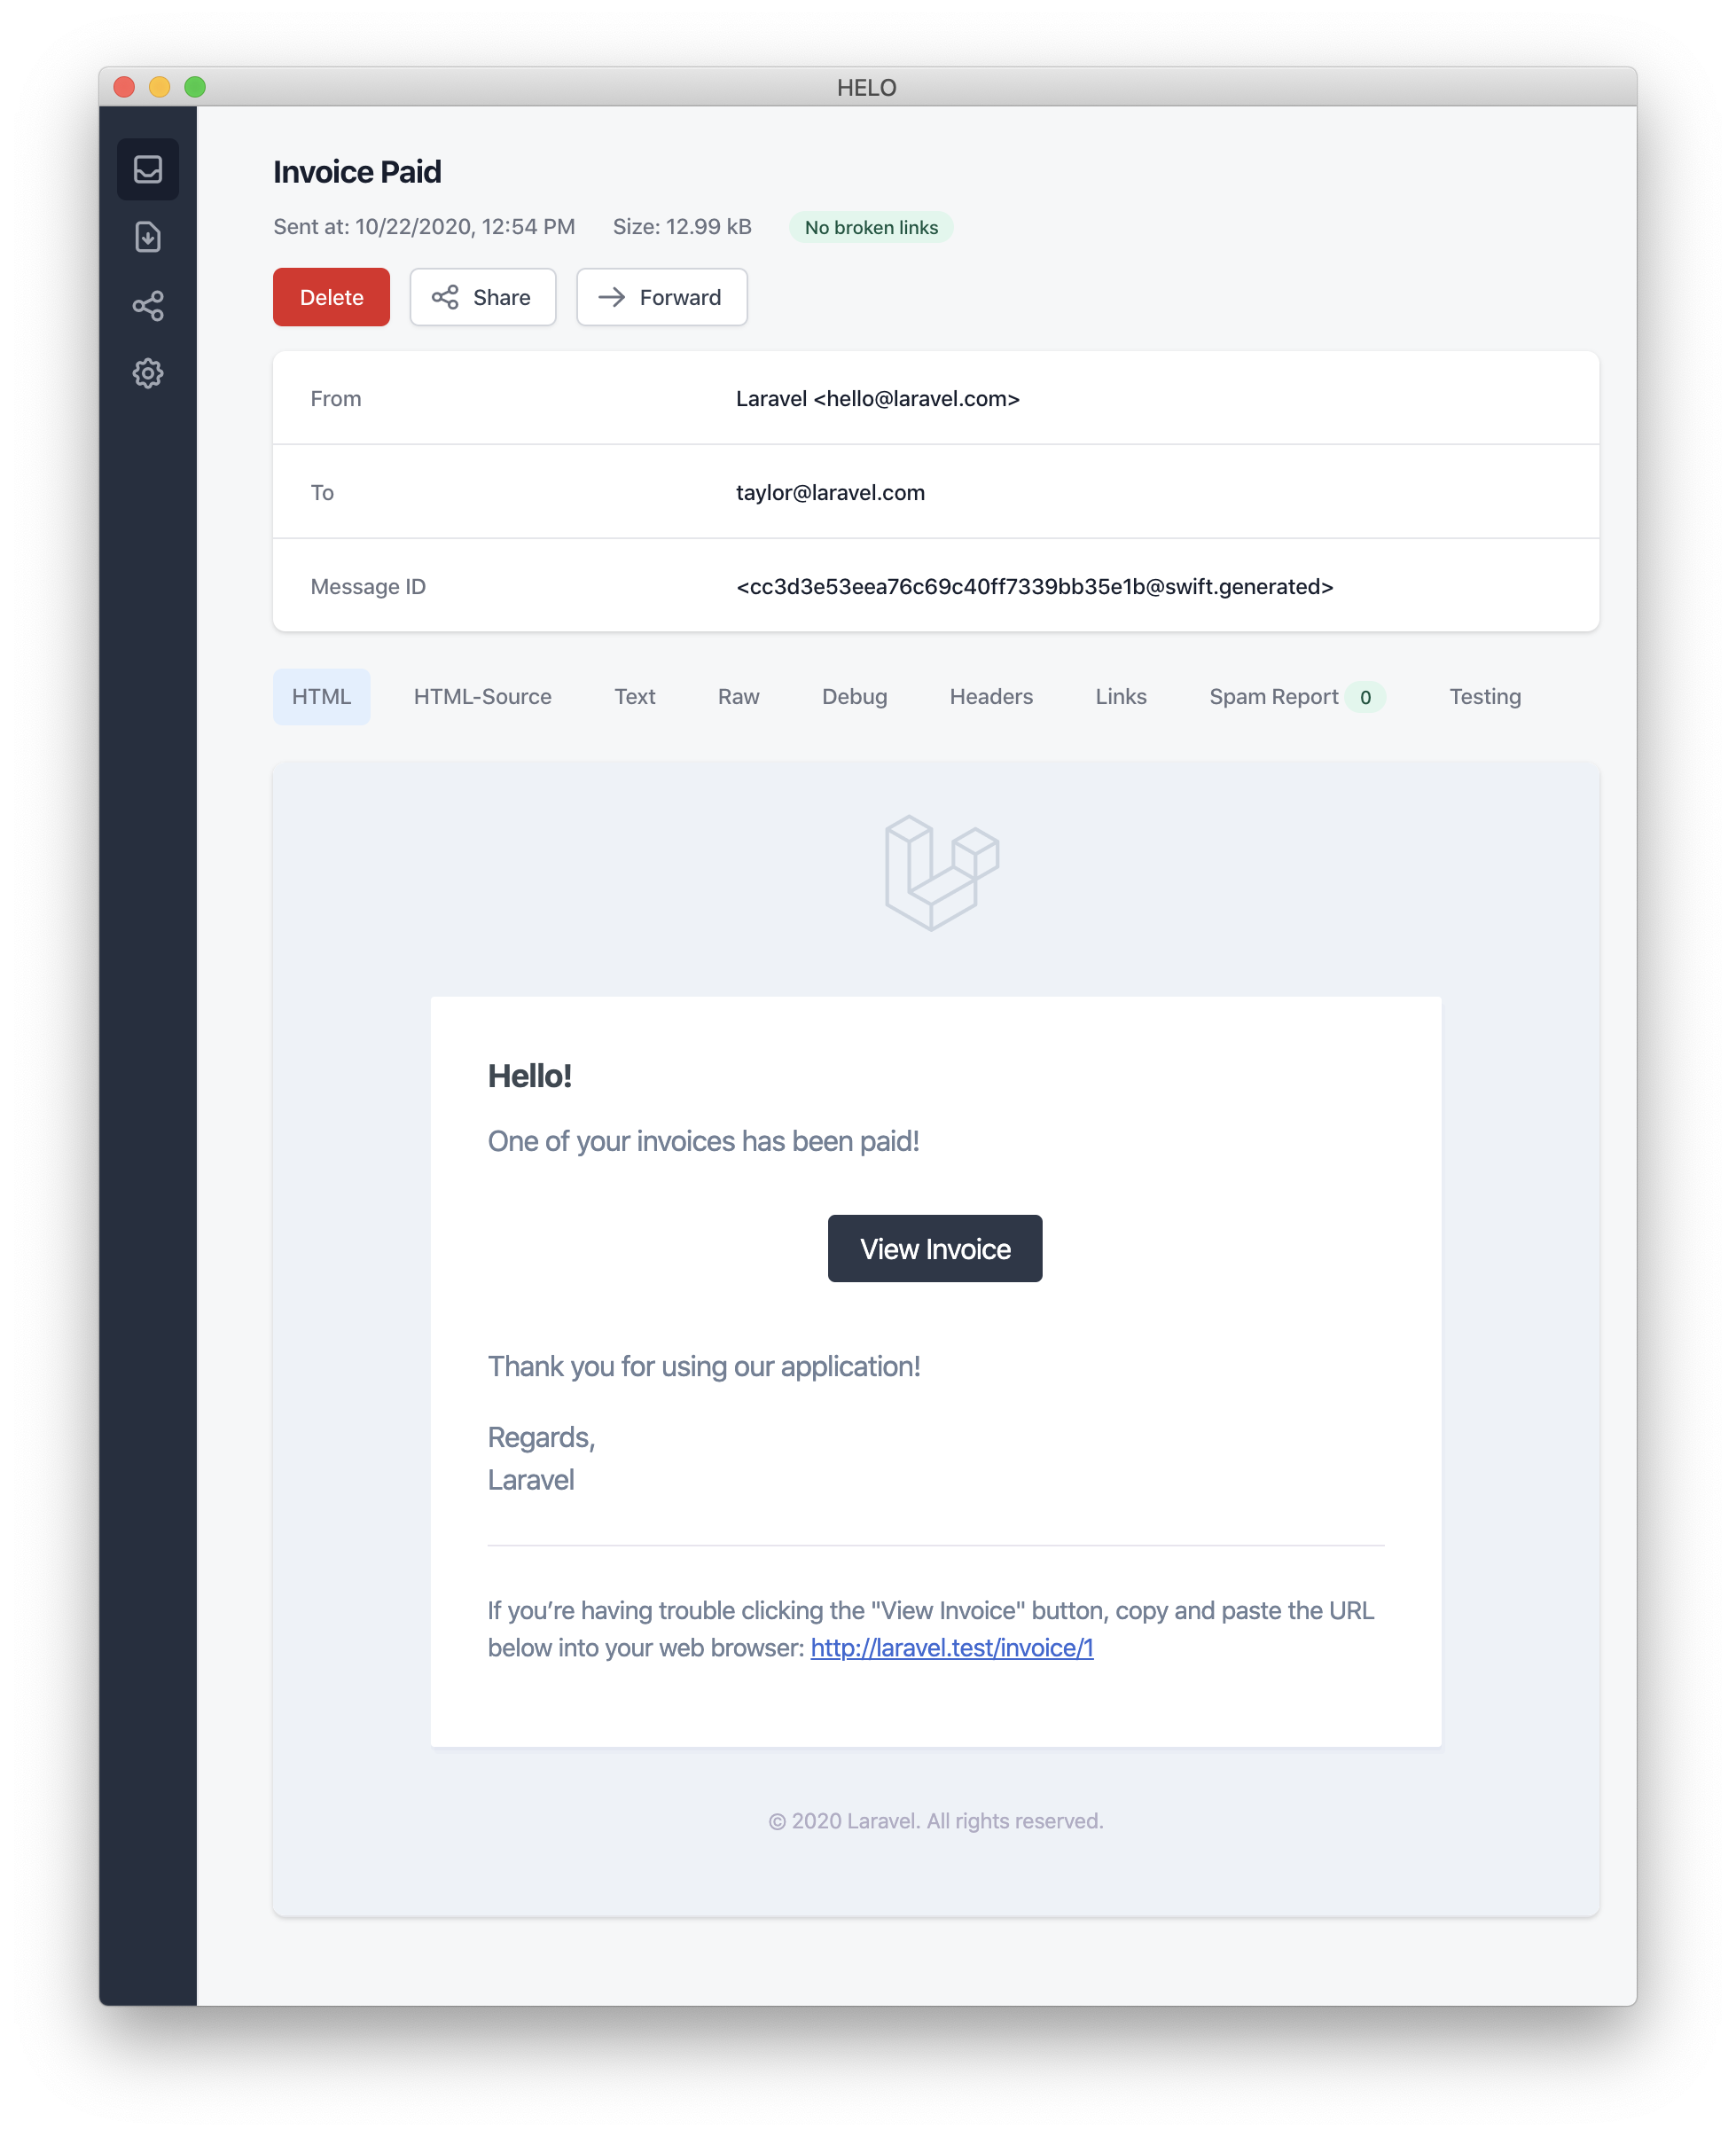
예제에서는 인사말(greeting), 텍스트 한 줄, call to action 버튼, 그리고 다시 텍스트 한 줄을 등록했습니다. MailMessage 객체가 제공하는 이러한 메서드들 덕분에 짧은 트랜잭션 이메일을 빠르고 간단하게 구성할 수 있습니다. mail 채널은 이렇게 작성된 메시지 구성 요소를 반응형 HTML 이메일 템플릿(그리고 그에 대응하는 일반 텍스트 버전)으로 변환해줍니다. 다음은 mail 채널이 생성한 이메일 예시입니다.
NOTE
메일 알림을 전송할 때는 config/app.php 설정 파일의 name 옵션을 반드시 설정해두세요. 이 값은 메일 알림 메시지의 헤더와 푸터에 사용됩니다.
오류 메시지
결제 실패와 같이 사용자에게 오류를 알리는 알림도 있을 수 있습니다. 메시지를 작성할 때 error 메서드를 호출하면 해당 메일 메시지가 오류에 관한 것임을 나타낼 수 있습니다. 메일 메시지에서 error 메서드를 사용하면 call to action 버튼이 검은색 대신 빨간색으로 표시됩니다.
/**
 * Get the mail representation of the notification.
 */
public function toMail(object $notifiable): MailMessage
{
    return (new MailMessage)
        ->error()
        ->subject('Invoice Payment Failed')
        ->line('...');
}
그 외 메일 알림 포맷 옵션
알림 클래스 안에서 텍스트 "line"을 직접 정의하는 대신, view 메서드를 사용해 알림 이메일 렌더링에 사용할 커스텀 템플릿을 지정할 수도 있습니다.
/**
 * Get the mail representation of the notification.
 */
public function toMail(object $notifiable): MailMessage
{
    return (new MailMessage)->view(
        'mail.invoice.paid', ['invoice' => $this->invoice]
    );
}
view 메서드에 전달하는 배열의 두 번째 요소로 뷰 이름을 지정하면, 메일 메시지에 대한 일반 텍스트 뷰도 함께 지정할 수 있습니다.
/**
 * Get the mail representation of the notification.
 */
public function toMail(object $notifiable): MailMessage
{
    return (new MailMessage)->view(
        ['mail.invoice.paid', 'mail.invoice.paid-text'],
        ['invoice' => $this->invoice]
    );
}
메시지에 일반 텍스트 뷰만 있는 경우에는 text 메서드를 사용하면 됩니다.
/**
 * Get the mail representation of the notification.
 */
public function toMail(object $notifiable): MailMessage
{
    return (new MailMessage)->text(
        'mail.invoice.paid-text', ['invoice' => $this->invoice]
    );
}
발신자 커스터마이징
기본적으로 이메일의 발신자 주소는 config/mail.php 설정 파일에 정의되어 있습니다. 하지만 특정 알림에 대해서는 from 메서드를 사용해 발신 주소를 직접 지정할 수 있습니다.
/**
 * Get the mail representation of the notification.
 */
public function toMail(object $notifiable): MailMessage
{
    return (new MailMessage)
        ->from('barrett@example.com', 'Barrett Blair')
        ->line('...');
}
수신자 커스터마이징
mail 채널을 통해 알림을 전송할 때, 알림 시스템은 알림 대상 엔터티(notifiable entity)의 email 속성을 자동으로 찾아 사용합니다. 알림을 전송할 이메일 주소를 직접 지정하고 싶다면, 알림 대상 엔터티에 routeNotificationForMail 메서드를 정의하면 됩니다.
<?php

namespace App\Models;

use Illuminate\Foundation\Auth\User as Authenticatable;
use Illuminate\Notifications\Notifiable;
use Illuminate\Notifications\Notification;

class User extends Authenticatable
{
    use Notifiable;

    /**
     * Route notifications for the mail channel.
     *
     * @return  array<string, string>|string
     */
    public function routeNotificationForMail(Notification $notification): array|string
    {
        // 이메일 주소만 반환하는 경우...
        return $this->email_address;

        // 이메일 주소와 이름을 함께 반환하는 경우...
        return [$this->email_address => $this->name];
    }
}
제목 커스터마이징
기본적으로 이메일의 제목은 알림 클래스 이름을 "Title Case" 형태로 변환한 값이 사용됩니다. 예를 들어 알림 클래스 이름이 InvoicePaid라면 이메일 제목은 Invoice Paid가 됩니다. 다른 제목을 지정하고 싶다면 메시지를 작성할 때 subject 메서드를 호출하세요.
/**
 * Get the mail representation of the notification.
 */
public function toMail(object $notifiable): MailMessage
{
    return (new MailMessage)
        ->subject('Notification Subject')
        ->line('...');
}
메일러 커스터마이징
기본적으로 이메일 알림은 config/mail.php 설정 파일에 정의된 기본 메일러를 통해 전송됩니다. 실행 시점에 다른 메일러를 사용하고 싶다면 메시지를 작성할 때 mailer 메서드를 호출하면 됩니다.
/**
 * Get the mail representation of the notification.
 */
public function toMail(object $notifiable): MailMessage
{
    return (new MailMessage)
        ->mailer('postmark')
        ->line('...');
}
템플릿 커스터마이징
알림 패키지의 리소스를 퍼블리시하면 메일 알림에서 사용하는 HTML 및 일반 텍스트 템플릿을 수정할 수 있습니다. 아래 명령어를 실행하면 메일 알림 템플릿이 resources/views/vendor/notifications 디렉터리에 생성됩니다.
php artisan vendor:publish --tag=laravel-notifications첨부 파일
이메일 알림에 첨부 파일을 추가하려면 메시지를 작성할 때 attach 메서드를 사용하세요. attach 메서드는 첫 번째 인자로 파일의 절대 경로를 받습니다.
/**
 * Get the mail representation of the notification.
 */
public function toMail(object $notifiable): MailMessage
{
    return (new MailMessage)
        ->greeting('Hello!')
        ->attach('/path/to/file');
}
NOTE
알림 메일 메시지가 제공하는 attach 메서드는 첨부 가능한 객체(attachable object)도 인자로 받을 수 있습니다. 자세한 내용은 첨부 가능한 객체 문서를 참고하세요.
파일을 첨부할 때 attach 메서드의 두 번째 인자로 배열을 전달하면 표시할 파일명이나 MIME 타입을 지정할 수 있습니다.
/**
 * Get the mail representation of the notification.
 */
public function toMail(object $notifiable): MailMessage
{
    return (new MailMessage)
        ->greeting('Hello!')
        ->attach('/path/to/file', [
            'as' => 'name.pdf',
            'mime' => 'application/pdf',
        ]);
}
필요하다면 attachMany 메서드를 사용해 여러 파일을 한 번에 첨부할 수도 있습니다.
/**
 * Get the mail representation of the notification.
 */
public function toMail(object $notifiable): MailMessage
{
    return (new MailMessage)
        ->greeting('Hello!')
        ->attachMany([
            '/path/to/forge.svg',
            '/path/to/vapor.svg' => [
                'as' => 'Logo.svg',
                'mime' => 'image/svg+xml',
            ],
        ]);
}
특정 파일시스템 디스크에 저장된 파일을 첨부하려면 attachFromStorageDisk 메서드를 사용하면 됩니다. 이 메서드는 디스크 이름과 해당 디스크 상의 파일 경로를 인자로 받습니다.
use App\Mail\InvoicePaid as InvoicePaidMailable;

/**
 * Get the mail representation of the notification.
 */
public function toMail(object $notifiable): Mailable
{
    return (new InvoicePaidMailable($this->invoice))
        ->to($notifiable->email)
        ->attachFromStorageDisk('s3', '/path/to/file', 'invoice.pdf', [
            'mime' => 'application/pdf',
        ]);
}
원시 데이터 첨부
attachData 메서드를 사용하면 바이트 문자열을 원시 데이터 그대로 첨부할 수 있습니다. attachData 메서드를 호출할 때는 첨부 파일에 부여할 파일명도 함께 지정해야 합니다.
/**
 * Get the mail representation of the notification.
 */
public function toMail(object $notifiable): MailMessage
{
    return (new MailMessage)
        ->greeting('Hello!')
        ->attachData($this->pdf, 'name.pdf', [
            'mime' => 'application/pdf',
        ]);
}
태그와 메타데이터 추가하기
Mailgun이나 Postmark 같은 일부 서드파티 이메일 제공업체는 메시지 "태그"와 "메타데이터" 기능을 지원합니다. 이를 활용하면 애플리케이션에서 발송한 이메일을 그룹화하거나 추적할 수 있습니다. tag와 metadata 메서드를 사용해 이메일 메시지에 태그와 메타데이터를 추가할 수 있습니다.
/**
 * Get the mail representation of the notification.
 */
public function toMail(object $notifiable): MailMessage
{
    return (new MailMessage)
        ->greeting('Comment Upvoted!')
        ->tag('upvote')
        ->metadata('comment_id', $this->comment->id);
}
애플리케이션이 Mailgun 드라이버를 사용 중이라면 태그와 메타데이터에 관한 Mailgun 공식 문서를 참고하세요. 마찬가지로 Postmark를 사용한다면 태그와 메타데이터에 관한 Postmark 문서를 참고할 수 있습니다.
Amazon SES를 사용해 이메일을 전송하는 경우에는 metadata 메서드를 사용해 SES "태그"를 메시지에 첨부해야 합니다.
Symfony 메시지 커스터마이징
MailMessage 클래스의 withSymfonyMessage 메서드를 사용하면 메시지가 발송되기 전에 Symfony Message 인스턴스와 함께 호출될 클로저를 등록할 수 있습니다. 이를 통해 메시지가 전달되기 전에 세밀한 커스터마이징을 적용할 수 있습니다.
use Symfony\Component\Mime\Email;

/**
 * Get the mail representation of the notification.
 */
public function toMail(object $notifiable): MailMessage
{
    return (new MailMessage)
        ->withSymfonyMessage(function (Email $message) {
            $message->getHeaders()->addTextHeader(
                'Custom-Header', 'Header Value'
            );
        });
}
Mailable 사용하기
필요한 경우, 알림의 toMail 메서드에서 완전한 Mailable 객체를 반환할 수도 있습니다. MailMessage 대신 Mailable을 반환할 때는 Mailable 객체의 to 메서드를 사용해 메시지 수신자를 직접 지정해야 합니다.
use App\Mail\InvoicePaid as InvoicePaidMailable;
use Illuminate\Mail\Mailable;

/**
 * Get the mail representation of the notification.
 */
public function toMail(object $notifiable): Mailable
{
    return (new InvoicePaidMailable($this->invoice))
        ->to($notifiable->email);
}
Mailable과 온디맨드 알림
온디맨드 알림을 전송하는 경우, toMail 메서드에 전달되는 $notifiable 인스턴스는 Illuminate\Notifications\AnonymousNotifiable의 인스턴스가 됩니다. 이 클래스는 온디맨드 알림을 전송할 이메일 주소를 조회할 수 있는 routeNotificationFor 메서드를 제공합니다.
use App\Mail\InvoicePaid as InvoicePaidMailable;
use Illuminate\Notifications\AnonymousNotifiable;
use Illuminate\Mail\Mailable;

/**
 * Get the mail representation of the notification.
 */
public function toMail(object $notifiable): Mailable
{
    $address = $notifiable instanceof AnonymousNotifiable
        ? $notifiable->routeNotificationFor('mail')
        : $notifiable->email;

    return (new InvoicePaidMailable($this->invoice))
        ->to($address);
}
메일 알림 미리보기
메일 알림 템플릿을 디자인할 때는 일반 Blade 템플릿을 다루듯 브라우저에서 렌더링 결과를 바로 확인할 수 있으면 매우 편리합니다. Laravel에서는 라우트 클로저나 컨트롤러에서 메일 알림이 생성한 메일 메시지를 그대로 반환할 수 있도록 지원합니다. MailMessage를 반환하면 브라우저에 곧바로 렌더링되어 표시되므로, 실제 이메일 주소로 발송하지 않고도 디자인을 빠르게 확인할 수 있습니다.
use App\Models\Invoice;
use App\Notifications\InvoicePaid;

Route::get('/notification', function () {
    $invoice = Invoice::find(1);

    return (new InvoicePaid($invoice))
        ->toMail($invoice->user);
});
##마크다운 메일 알림
마크다운(Markdown) 메일 알림을 사용하면 미리 만들어진 메일 알림 템플릿의 장점을 그대로 누리면서도, 더 길고 자유로운 형식의 커스텀 메시지를 작성할 수 있습니다. 메시지를 Markdown 문법으로 작성하면 Laravel이 이를 반응형 HTML 템플릿으로 렌더링해주는 동시에, 일반 텍스트(plain-text) 버전도 자동으로 함께 생성해줍니다.
메시지 생성하기
Markdown 템플릿이 포함된 알림을 생성하려면 make:notification Artisan 명령어에 --markdown 옵션을 사용하면 됩니다:
php artisan make:notification InvoicePaid --markdown=mail.invoice.paid다른 메일 알림과 마찬가지로, Markdown 템플릿을 사용하는 알림 클래스에도 toMail 메서드를 정의해야 합니다. 다만 line이나 action 메서드로 메시지를 구성하는 대신, 사용할 Markdown 템플릿의 이름을 지정하는 markdown 메서드를 사용합니다. 템플릿에서 사용할 데이터 배열은 메서드의 두 번째 인자로 전달할 수 있습니다:
/**
 * 알림의 메일 표현(representation)을 가져옵니다.
 */
public function toMail(object $notifiable): MailMessage
{
    $url = url('/invoice/'.$this->invoice->id);

    return (new MailMessage)
        ->subject('Invoice Paid')
        ->markdown('mail.invoice.paid', ['url' => $url]);
}
메시지 작성하기
마크다운 메일 알림은 Blade 컴포넌트와 Markdown 문법을 함께 사용하여, Laravel이 미리 만들어 둔 알림용 컴포넌트를 활용하면서도 손쉽게 알림 메시지를 작성할 수 있게 해줍니다:
<x-mail::message>
<h1 id="panel-component">인보이스 결제 완료</h1>

인보이스 결제가 완료되었습니다!

<x-mail::button :url="$url">
인보이스 확인하기
</x-mail::button>

감사합니다,<br>
{{ config('app.name') }}
</x-mail::message>
NOTE
Markdown 메일을 작성할 때는 불필요한 들여쓰기를 사용하지 않도록 주의하세요. Markdown 표준상 들여쓰기된 내용은 코드 블록으로 렌더링되기 때문입니다.
버튼 컴포넌트
버튼 컴포넌트는 가운데 정렬된 버튼 링크를 렌더링합니다. 이 컴포넌트는 url과 선택적으로 color 두 가지 인자를 받으며, 지원하는 색상은 primary, green, red입니다. 하나의 알림에 원하는 만큼 여러 개의 버튼 컴포넌트를 추가할 수 있습니다:
<x-mail::button :url="$url" color="green">
인보이스 확인하기
</x-mail::button>
패널 컴포넌트
패널 컴포넌트는 주어진 텍스트 블록을, 알림 본문과는 살짝 다른 배경색을 가진 패널 안에 렌더링합니다. 이를 통해 특정 텍스트 블록을 시각적으로 강조할 수 있습니다:
<x-mail::panel>
패널에 표시할 내용입니다.
</x-mail::panel>
테이블 컴포넌트
테이블 컴포넌트는 Markdown 표를 HTML 테이블로 변환해줍니다. 이 컴포넌트는 Markdown 표 문법을 그대로 내용으로 받으며, 기본 Markdown 표 정렬 문법을 사용해 컬럼 정렬도 지원합니다:
<x-mail::table>
| Laravel       | Table         | Example       |
| ------------- | :-----------: | ------------: |
| 2번째 컬럼은  | 가운데 정렬   | $10           |
| 3번째 컬럼은  | 오른쪽 정렬   | $20           |
</x-mail::table>
컴포넌트 커스터마이징
Markdown 알림 컴포넌트 전체를 애플리케이션으로 내보내(export) 자유롭게 커스터마이징할 수 있습니다. 컴포넌트를 내보내려면 vendor:publish Artisan 명령어로 laravel-mail 에셋 태그를 퍼블리시하면 됩니다:
php artisan vendor:publish --tag=laravel-mail이 명령어를 실행하면 Markdown 메일 컴포넌트가 resources/views/vendor/mail 디렉터리에 퍼블리시됩니다. mail 디렉터리 안에는 html과 text 디렉터리가 있으며, 각각 사용 가능한 모든 컴포넌트의 HTML 버전과 텍스트 버전이 들어 있습니다. 이 파일들은 원하는 대로 자유롭게 수정할 수 있습니다.
CSS 커스터마이징
컴포넌트를 내보내고 나면 resources/views/vendor/mail/html/themes 디렉터리에 default.css 파일이 생성됩니다. 이 파일의 CSS를 수정하면, 해당 스타일이 Markdown 알림의 HTML 버전에 자동으로 인라인(inline) 처리되어 적용됩니다.
Laravel의 Markdown 컴포넌트를 위한 완전히 새로운 테마를 만들고 싶다면, html/themes 디렉터리 안에 새 CSS 파일을 추가하면 됩니다. CSS 파일을 저장한 뒤에는 mail 설정 파일의 theme 옵션 값을 새로 만든 테마 이름과 일치하도록 수정해주세요.
특정 알림 하나에만 개별적으로 테마를 적용하고 싶다면, 메일 메시지를 구성할 때 theme 메서드를 호출하면 됩니다. theme 메서드는 해당 알림을 보낼 때 사용할 테마 이름을 인자로 받습니다:
/**
 * 알림의 메일 표현(representation)을 가져옵니다.
 */
public function toMail(object $notifiable): MailMessage
{
    return (new MailMessage)
        ->theme('invoice')
        ->subject('Invoice Paid')
        ->markdown('mail.invoice.paid', ['url' => $url]);
}
데이터베이스 알림
사전 준비 사항
database 알림 채널은 알림 정보를 데이터베이스 테이블에 저장합니다. 이 테이블에는 알림 타입과, 알림 내용을 설명하는 JSON 형태의 데이터가 함께 저장됩니다.
애플리케이션의 UI에서 알림을 보여주려면 이 테이블을 조회하면 됩니다. 다만 그 전에, 알림을 저장할 데이터베이스 테이블을 먼저 만들어야 합니다. make:notifications-table 명령어를 실행하면 적절한 테이블 스키마를 가진 마이그레이션이 생성됩니다:
php artisan make:notifications-tablephp artisan migrateNOTE
notifiable 모델에서 UUID나 ULID를 기본 키로 사용하고 있다면, 알림 테이블 마이그레이션에서 morphs 메서드 대신 uuidMorphs나 ulidMorphs를 사용해야 합니다.
데이터베이스 알림 형식 지정하기
어떤 알림을 데이터베이스 테이블에 저장하고 싶다면, 해당 알림 클래스에 toDatabase 또는 toArray 메서드를 정의해야 합니다. 이 메서드는 $notifiable 엔티티를 인자로 받아 일반적인 PHP 배열을 반환해야 합니다. 반환된 배열은 JSON으로 인코딩되어 notifications 테이블의 data 컬럼에 저장됩니다. 다음은 toArray 메서드의 예시입니다:
/**
 * 알림의 배열 표현을 가져옵니다.
 *
 * @return array<string, mixed>
 */
public function toArray(object $notifiable): array
{
    return [
        'invoice_id' => $this->invoice->id,
        'amount' => $this->invoice->amount,
    ];
}
알림이 데이터베이스에 저장될 때, 기본적으로 type 컬럼에는 알림 클래스명이 저장되고 read_at 컬럼은 null로 설정됩니다. 하지만 알림 클래스에 databaseType과 initialDatabaseReadAtValue 메서드를 정의하면 이 동작을 원하는 대로 바꿀 수 있습니다:
use Illuminate\Support\Carbon;

/**
 * 알림의 데이터베이스 타입을 가져옵니다.
 */
public function databaseType(object $notifiable): string
{
    return 'invoice-paid';
}

/**
 * "read_at" 컬럼의 초기값을 가져옵니다.
 */
public function initialDatabaseReadAtValue(): ?Carbon
{
    return null;
}
`toDatabase`와 `toArray`의 차이
toArray 메서드는 broadcast 채널에서도 사용되어, JavaScript 기반 프런트엔드로 어떤 데이터를 브로드캐스트할지 결정하는 데 쓰입니다. 만약 database 채널과 broadcast 채널에 서로 다른 배열 표현을 사용하고 싶다면, toArray 대신 toDatabase 메서드를 정의하면 됩니다.
알림 조회하기
알림이 데이터베이스에 저장되고 나면, notifiable 엔티티에서 이를 편리하게 조회할 방법이 필요합니다. Laravel의 기본 App\Models\User 모델에 포함된 Illuminate\Notifications\Notifiable 트레이트는 해당 엔티티의 알림을 반환하는 notifications라는 Eloquent 연관관계를 제공합니다. 다른 Eloquent 연관관계와 마찬가지로 이 메서드에 접근해 알림을 가져올 수 있습니다. 기본적으로 알림은 created_at 타임스탬프 기준으로 정렬되며, 가장 최근 알림이 컬렉션의 맨 앞에 위치합니다:
$user = App\Models\User::find(1);

foreach ($user->notifications as $notification) {
    echo $notification->type;
}
"읽지 않은" 알림만 조회하고 싶다면 unreadNotifications 연관관계를 사용하면 됩니다. 이 경우에도 created_at 타임스탬프 기준으로 정렬되며, 최신 알림이 먼저 표시됩니다:
$user = App\Models\User::find(1);

foreach ($user->unreadNotifications as $notification) {
    echo $notification->type;
}
"읽은" 알림만 조회하고 싶다면 readNotifications 연관관계를 사용하세요:
$user = App\Models\User::find(1);

foreach ($user->readNotifications as $notification) {
    echo $notification->type;
}
NOTE
JavaScript 클라이언트에서 알림에 접근하려면, 현재 사용자와 같은 notifiable 엔티티의 알림을 반환하는 알림 전용 컨트롤러를 애플리케이션에 정의해야 합니다. 이후 JavaScript 클라이언트에서 해당 컨트롤러의 URL로 HTTP 요청을 보내면 됩니다.
알림을 읽음으로 표시하기
일반적으로 사용자가 알림을 확인하면 해당 알림을 "읽음" 상태로 표시하고 싶을 것입니다. Illuminate\Notifications\Notifiable 트레이트는 알림의 데이터베이스 레코드에서 read_at 컬럼을 업데이트해주는 markAsRead 메서드를 제공합니다:
$user = App\Models\User::find(1);

foreach ($user->unreadNotifications as $notification) {
    $notification->markAsRead();
}
각 알림을 하나씩 순회하는 대신, 알림 컬렉션에 대해 바로 markAsRead 메서드를 호출할 수도 있습니다:
$user->unreadNotifications->markAsRead();또한 데이터베이스에서 알림을 실제로 조회하지 않고도, 일괄 업데이트 쿼리를 사용해 모든 알림을 한 번에 읽음 처리할 수 있습니다:
$user = App\Models\User::find(1);

$user->unreadNotifications()->update(['read_at' => now()]);
알림을 테이블에서 완전히 삭제하려면 delete 메서드를 사용하면 됩니다:
$user->notifications()->delete();알림 (8/14): 브로드캐스트 알림
사전 준비 사항
브로드캐스트 알림을 사용하려면 먼저 Laravel의 이벤트 브로드캐스팅 기능을 설정하고 그 동작 방식을 어느 정도 이해하고 있어야 합니다. 이벤트 브로드캐스팅은 서버 측에서 발생한 Laravel 이벤트를 JavaScript 기반 프론트엔드에서 실시간으로 감지할 수 있게 해주는 기능입니다.
브로드캐스트 알림 포맷 지정하기
broadcast 채널은 Laravel의 이벤트 브로드캐스팅 기능을 이용해 알림을 브로드캐스트하며, 이를 통해 JavaScript 기반 프론트엔드에서 알림을 실시간으로 받아볼 수 있습니다. 알림 클래스가 브로드캐스트를 지원하도록 하려면 toBroadcast 메서드를 정의하면 됩니다. 이 메서드는 $notifiable 엔티티를 인자로 받아 BroadcastMessage 인스턴스를 반환해야 합니다. 만약 toBroadcast 메서드가 정의되어 있지 않다면, toArray 메서드의 반환값이 브로드캐스트할 데이터로 사용됩니다. 이렇게 반환된 데이터는 JSON으로 인코딩되어 프론트엔드로 브로드캐스트됩니다. 다음은 toBroadcast 메서드의 예시입니다.
use Illuminate\Notifications\Messages\BroadcastMessage;

/**
 * 알림의 브로드캐스트 가능한 표현을 반환합니다.
 */
public function toBroadcast(object $notifiable): BroadcastMessage
{
    return new BroadcastMessage([
        'invoice_id' => $this->invoice->id,
        'amount' => $this->invoice->amount,
    ]);
}
브로드캐스트 큐 설정
모든 브로드캐스트 알림은 큐를 통해 처리됩니다. 브로드캐스트 작업에 사용할 큐 커넥션이나 큐 이름을 지정하고 싶다면, BroadcastMessage의 onConnection, onQueue 메서드를 사용하면 됩니다.
return (new BroadcastMessage($data))
    ->onConnection('sqs')
    ->onQueue('broadcasts');
알림 타입 커스터마이징하기
직접 지정한 데이터 외에도, 모든 브로드캐스트 알림에는 해당 알림 클래스의 전체 클래스명이 담긴 type 필드가 자동으로 포함됩니다. 이 type 값을 원하는 대로 바꾸고 싶다면, 알림 클래스에 broadcastType 메서드를 정의하면 됩니다.
/**
 * 브로드캐스트되는 알림의 타입을 반환합니다.
 */
public function broadcastType(): string
{
    return 'broadcast.message';
}
알림 수신 대기하기
알림은 {notifiable}.{id} 형식으로 만들어지는 프라이빗 채널을 통해 브로드캐스트됩니다. 예를 들어 ID가 1인 App\Models\User 인스턴스에게 알림을 보내면, 해당 알림은 App.Models.User.1이라는 프라이빗 채널로 브로드캐스트됩니다. Laravel Echo를 사용 중이라면, notification 메서드를 이용해 손쉽게 채널의 알림을 수신 대기할 수 있습니다.
Echo.private('App.Models.User.' + userId)
    .notification((notification) => {
        console.log(notification.type);
    });
React, Vue, Svelte에서 사용하기
Laravel Echo에는 React, Vue, Svelte용 훅(hook)이 포함되어 있어 알림을 손쉽게 수신할 수 있습니다. useEchoNotification 훅을 호출하면 알림을 수신 대기할 수 있으며, 이 훅을 사용하는 컴포넌트가 언마운트되면 자동으로 채널에서 나가게 됩니다.
React
import { useEchoNotification } from "@laravel/echo-react";

useEchoNotification(
    `App.Models.User.${userId}`,
    (notification) => {
        console.log(notification.type);
    },
);
Vue
<script setup lang="ts">
import { useEchoNotification } from "@laravel/echo-vue";

useEchoNotification(
    `App.Models.User.${userId}`,
    (notification) => {
        console.log(notification.type);
    },
);
</script>
Svelte
<script>
import { useEchoNotification } from "@laravel/echo-svelte";

useEchoNotification(
    `App.Models.User.${userId}`,
    (notification) => {
        console.log(notification.type);
    },
);
</script>
기본적으로 이 훅은 모든 종류의 알림을 수신합니다. 특정 알림 타입만 수신하고 싶다면, useEchoNotification에 문자열 또는 문자열 배열 형태로 타입을 지정할 수 있습니다.
React
import { useEchoNotification } from "@laravel/echo-react";

useEchoNotification(
    `App.Models.User.${userId}`,
    (notification) => {
        console.log(notification.type);
    },
    'App.Notifications.InvoicePaid',
);
Vue
<script setup lang="ts">
import { useEchoNotification } from "@laravel/echo-vue";

useEchoNotification(
    `App.Models.User.${userId}`,
    (notification) => {
        console.log(notification.type);
    },
    'App.Notifications.InvoicePaid',
);
</script>
Svelte
<script>
import { useEchoNotification } from "@laravel/echo-svelte";

useEchoNotification(
    `App.Models.User.${userId}`,
    (notification) => {
        console.log(notification.type);
    },
    'App.Notifications.InvoicePaid',
);
</script>
또한 알림 payload 데이터의 형태(shape)를 타입으로 지정해두면, 더 나은 타입 안전성과 편리한 자동완성 기능을 활용할 수 있습니다.
type InvoicePaidNotification = {
    invoice_id: number;
    created_at: string;
};

useEchoNotification<InvoicePaidNotification>(
    `App.Models.User.${userId}`,
    (notification) => {
        console.log(notification.invoice_id);
        console.log(notification.created_at);
        console.log(notification.type);
    },
    'App.Notifications.InvoicePaid',
);
알림 채널 커스터마이징하기
알림을 받을 엔티티가 브로드캐스트 알림을 어떤 채널로 받을지 직접 지정하고 싶다면, 해당 엔티티(notifiable)에 receivesBroadcastNotificationsOn 메서드를 정의하면 됩니다.
<?php

namespace App\Models;

use Illuminate\Broadcasting\PrivateChannel;
use Illuminate\Foundation\Auth\User as Authenticatable;
use Illuminate\Notifications\Notifiable;

class User extends Authenticatable
{
    use Notifiable;

    /**
     * 사용자가 알림 브로드캐스트를 받을 채널을 반환합니다.
     */
    public function receivesBroadcastNotificationsOn(): string
    {
        return 'users.'.$this->id;
    }
}
NOTE
위 예시처럼 receivesBroadcastNotificationsOn 메서드를 커스터마이징하면, 기본값인 App.Models.User.{id} 대신 원하는 채널명(예: users.1)으로 알림을 받을 수 있습니다. 다만 이 경우 프론트엔드에서도 동일한 채널명으로 구독하도록 함께 맞춰줘야 합니다.
SMS 알림
사전 준비 사항
라라벨에서 SMS 알림을 보내는 기능은 Vonage(구 Nexmo)를 통해 지원됩니다. Vonage로 알림을 전송하려면 먼저 laravel/vonage-notification-channel과 guzzlehttp/guzzle 패키지를 설치해야 합니다.
composer require laravel/vonage-notification-channel guzzlehttp/guzzle이 패키지에는 설정 파일이 포함되어 있지만, 반드시 애플리케이션으로 이 설정 파일을 내보내야(export) 하는 것은 아닙니다. 그냥 VONAGE_KEY와 VONAGE_SECRET 환경 변수에 Vonage에서 발급받은 공개 키와 비밀 키를 지정하기만 하면 됩니다.
키를 설정한 후에는 SMS 메시지를 발송할 기본 발신 번호를 지정하는 VONAGE_SMS_FROM 환경 변수도 설정해야 합니다. 이 발신 번호는 Vonage 관리자 콘솔에서 생성할 수 있습니다.
VONAGE_SMS_FROM=15556666666SMS 알림 포맷팅하기
알림을 SMS로 전송하려면 알림 클래스에 toVonage 메서드를 정의해야 합니다. 이 메서드는 $notifiable 엔티티를 인자로 받으며, Illuminate\Notifications\Messages\VonageMessage 인스턴스를 반환해야 합니다.
use Illuminate\Notifications\Messages\VonageMessage;

/**
 * 알림의 Vonage / SMS 표현을 반환합니다.
 */
public function toVonage(object $notifiable): VonageMessage
{
    return (new VonageMessage)
        ->content('Your SMS message content');
}
유니코드 콘텐츠
SMS 메시지에 유니코드 문자(한글 포함)가 포함된다면, VonageMessage 인스턴스를 생성할 때 unicode 메서드를 호출해야 합니다.
NOTE
한글 메시지를 보낼 경우 대부분 유니코드 인코딩이 필요하므로, 국내 서비스에서는 이 메서드를 거의 항상 사용하게 됩니다.
use Illuminate\Notifications\Messages\VonageMessage;

/**
 * 알림의 Vonage / SMS 표현을 반환합니다.
 */
public function toVonage(object $notifiable): VonageMessage
{
    return (new VonageMessage)
        ->content('Your unicode message')
        ->unicode();
}
발신 번호 커스터마이징하기
VONAGE_SMS_FROM 환경 변수에 지정된 번호가 아닌 다른 번호로 특정 알림을 발송하고 싶다면, VonageMessage 인스턴스에서 from 메서드를 호출하면 됩니다.
use Illuminate\Notifications\Messages\VonageMessage;

/**
 * 알림의 Vonage / SMS 표현을 반환합니다.
 */
public function toVonage(object $notifiable): VonageMessage
{
    return (new VonageMessage)
        ->content('Your SMS message content')
        ->from('15554443333');
}
클라이언트 참조 값 추가하기
사용자, 팀, 또는 고객사별로 발송 비용을 추적하고 싶다면 알림에 "클라이언트 참조(client reference)" 값을 추가할 수 있습니다. Vonage는 이 클라이언트 참조 값을 기준으로 리포트를 생성해주므로, 특정 고객의 SMS 사용량을 더 명확하게 파악할 수 있습니다. 클라이언트 참조 값은 최대 40자까지의 문자열을 사용할 수 있습니다.
use Illuminate\Notifications\Messages\VonageMessage;

/**
 * 알림의 Vonage / SMS 표현을 반환합니다.
 */
public function toVonage(object $notifiable): VonageMessage
{
    return (new VonageMessage)
        ->clientReference((string) $notifiable->id)
        ->content('Your SMS message content');
}
SMS 알림 라우팅하기
Vonage 알림을 올바른 전화번호로 라우팅하려면, 알림을 받을 엔티티(notifiable entity)에 routeNotificationForVonage 메서드를 정의하세요.
<?php

namespace App\Models;

use Illuminate\Foundation\Auth\User as Authenticatable;
use Illuminate\Notifications\Notifiable;
use Illuminate\Notifications\Notification;

class User extends Authenticatable
{
    use Notifiable;

    /**
     * Vonage 채널에 대한 알림을 라우팅합니다.
     */
    public function routeNotificationForVonage(Notification $notification): string
    {
        return $this->phone_number;
    }
}
Slack 알림
사전 준비
Slack 알림을 보내려면 먼저 Composer로 Slack 알림 채널 패키지를 설치해야 합니다:
composer require laravel/slack-notification-channel또한 Slack 워크스페이스에 Slack App을 생성해야 합니다.
App이 생성된 워크스페이스와 동일한 워크스페이스로만 알림을 보낼 예정이라면, 해당 App에 chat:write, chat:write.public, chat:write.customize 스코프가 부여되어 있는지 확인하세요. 이 스코프들은 Slack의 App 관리 화면에서 "OAuth & Permissions" 탭을 통해 추가할 수 있습니다.
그런 다음 App의 "Bot User OAuth Token"을 복사해서 애플리케이션의 services.php 설정 파일 내 slack 설정 배열에 넣어주세요. 이 토큰은 Slack의 "OAuth & Permissions" 탭에서 확인할 수 있습니다:
'slack' => [
    'notifications' => [
        'bot_user_oauth_token' => env('SLACK_BOT_USER_OAUTH_TOKEN'),
        'channel' => env('SLACK_BOT_USER_DEFAULT_CHANNEL'),
    ],
],
App 배포(Distribution)
애플리케이션 사용자가 소유한 외부 Slack 워크스페이스로 알림을 보내야 한다면, Slack을 통해 App을 "배포"해야 합니다. App 배포는 Slack의 App 관리 화면에서 "Manage Distribution" 탭을 통해 관리할 수 있습니다. App이 배포되고 나면, Socialite를 사용해 애플리케이션 사용자를 대신하여 Slack Bot 토큰을 발급받을 수 있습니다.
Slack 알림 포맷팅하기
알림을 Slack 메시지로 보낼 수 있도록 지원하려면, 알림 클래스에 toSlack 메서드를 정의해야 합니다. 이 메서드는 $notifiable 엔티티를 전달받으며, Illuminate\Notifications\Slack\SlackMessage 인스턴스를 반환해야 합니다. Slack의 Block Kit API를 사용하면 풍부한 형태의 알림을 구성할 수 있습니다. 아래 예제는 Slack Block Kit builder에서 미리 볼 수 있습니다:
use Illuminate\Notifications\Slack\BlockKit\Blocks\ContextBlock;
use Illuminate\Notifications\Slack\BlockKit\Blocks\SectionBlock;
use Illuminate\Notifications\Slack\SlackMessage;

/**
 * 알림의 Slack 표현을 반환합니다.
 */
public function toSlack(object $notifiable): SlackMessage
{
    return (new SlackMessage)
        ->text('One of your invoices has been paid!')
        ->headerBlock('Invoice Paid')
        ->contextBlock(function (ContextBlock $block) {
            $block->text('Customer #1234');
        })
        ->sectionBlock(function (SectionBlock $block) {
            $block->text('An invoice has been paid.');
            $block->field("*Invoice No:*\n1000")->markdown();
            $block->field("*Invoice Recipient:*\ntaylor@laravel.com")->markdown();
        })
        ->dividerBlock()
        ->sectionBlock(function (SectionBlock $block) {
            $block->text('Congratulations!');
        });
}
Slack Block Kit Builder 템플릿 사용하기
메시지 빌더의 fluent 메서드로 Block Kit 메시지를 하나씩 구성하는 대신, Slack의 Block Kit Builder에서 생성된 원본 JSON 페이로드를 usingBlockKitTemplate 메서드에 그대로 전달할 수도 있습니다:
use Illuminate\Notifications\Slack\SlackMessage;
use Illuminate\Support\Str;

/**
 * 알림의 Slack 표현을 반환합니다.
 */
public function toSlack(object $notifiable): SlackMessage
{
    $template = <<<JSON
        {
          "blocks": [
            {
              "type": "header",
              "text": {
                "type": "plain_text",
                "text": "Team Announcement"
              }
            },
            {
              "type": "section",
              "text": {
                "type": "plain_text",
                "text": "We are hiring!"
              }
            }
          ]
        }
    JSON;

    return (new SlackMessage)
        ->usingBlockKitTemplate($template);
}
Slack 인터랙션 처리하기
Slack의 Block Kit 알림 시스템은 사용자 인터랙션을 처리할 수 있는 강력한 기능을 제공합니다. 이 기능을 사용하려면 Slack App에서 "Interactivity" 기능을 활성화하고, 애플리케이션이 제공하는 URL을 가리키는 "Request URL"을 설정해야 합니다. 이 설정들은 Slack의 App 관리 화면 "Interactivity & Shortcuts" 탭에서 관리할 수 있습니다.
아래 예제는 actionsBlock 메서드를 활용한 것으로, 사용자가 버튼을 클릭하면 Slack이 설정된 "Request URL"로 POST 요청을 보냅니다. 이 요청의 페이로드에는 버튼을 클릭한 Slack 사용자 정보, 클릭된 버튼의 ID 등이 담겨 있습니다. 애플리케이션은 이 페이로드를 바탕으로 어떤 동작을 수행할지 결정할 수 있습니다. 이때 해당 요청이 실제로 Slack에서 온 것인지 반드시 검증해야 합니다:
use Illuminate\Notifications\Slack\BlockKit\Blocks\ActionsBlock;
use Illuminate\Notifications\Slack\BlockKit\Blocks\ContextBlock;
use Illuminate\Notifications\Slack\BlockKit\Blocks\SectionBlock;
use Illuminate\Notifications\Slack\SlackMessage;

/**
 * 알림의 Slack 표현을 반환합니다.
 */
public function toSlack(object $notifiable): SlackMessage
{
    return (new SlackMessage)
        ->text('One of your invoices has been paid!')
        ->headerBlock('Invoice Paid')
        ->contextBlock(function (ContextBlock $block) {
            $block->text('Customer #1234');
        })
        ->sectionBlock(function (SectionBlock $block) {
            $block->text('An invoice has been paid.');
        })
        ->actionsBlock(function (ActionsBlock $block) {
             // ID는 기본적으로 "button_acknowledge_invoice"입니다...
            $block->button('Acknowledge Invoice')->primary();

            // ID를 직접 지정할 수도 있습니다...
            $block->button('Deny')->danger()->id('deny_invoice');
        });
}
확인 모달(Confirmation Modals)
사용자가 특정 동작을 수행하기 전에 확인하도록 하고 싶다면, 버튼을 정의할 때 confirm 메서드를 호출하면 됩니다. confirm 메서드는 메시지와, ConfirmObject 인스턴스를 전달받는 클로저를 인자로 받습니다:
use Illuminate\Notifications\Slack\BlockKit\Blocks\ActionsBlock;
use Illuminate\Notifications\Slack\BlockKit\Blocks\ContextBlock;
use Illuminate\Notifications\Slack\BlockKit\Blocks\SectionBlock;
use Illuminate\Notifications\Slack\BlockKit\Composites\ConfirmObject;
use Illuminate\Notifications\Slack\SlackMessage;

/**
 * 알림의 Slack 표현을 반환합니다.
 */
public function toSlack(object $notifiable): SlackMessage
{
    return (new SlackMessage)
        ->text('One of your invoices has been paid!')
        ->headerBlock('Invoice Paid')
        ->contextBlock(function (ContextBlock $block) {
            $block->text('Customer #1234');
        })
        ->sectionBlock(function (SectionBlock $block) {
            $block->text('An invoice has been paid.');
        })
        ->actionsBlock(function (ActionsBlock $block) {
            $block->button('Acknowledge Invoice')
                ->primary()
                ->confirm(
                    'Acknowledge the payment and send a thank you email?',
                    function (ConfirmObject $dialog) {
                        $dialog->confirm('Yes');
                        $dialog->deny('No');
                    }
                );
        });
}
Slack 블록 미리보기
지금까지 작성한 블록들을 빠르게 확인하고 싶다면, SlackMessage 인스턴스에서 dd 메서드를 호출하면 됩니다. dd 메서드는 Slack의 Block Kit Builder URL을 생성하여 덤프하며, 브라우저에서 페이로드와 알림 미리보기를 확인할 수 있습니다. dd 메서드에 true를 전달하면 원본 페이로드 자체를 덤프합니다:
return (new SlackMessage)
    ->text('One of your invoices has been paid!')
    ->headerBlock('Invoice Paid')
    ->dd();
Slack 알림 라우팅하기
Slack 알림을 원하는 Slack 팀과 채널로 전달하려면, notifiable 모델에 routeNotificationForSlack 메서드를 정의하세요. 이 메서드는 다음 세 가지 중 하나의 값을 반환할 수 있습니다:
null- 알림 자체에 설정된 채널로 라우팅을 위임합니다.SlackMessage를 빌드할 때to메서드를 사용하면 알림 안에서 채널을 직접 지정할 수 있습니다.- 알림을 보낼 Slack 채널을 지정하는 문자열, 예:
#support-channel. SlackRoute인스턴스. OAuth 토큰과 채널명을 함께 지정할 수 있습니다. 예:SlackRoute::make($this->slack_channel, $this->slack_token). 이 방식은 외부 워크스페이스로 알림을 보낼 때 사용해야 합니다.
예를 들어, routeNotificationForSlack 메서드에서 #support-channel을 반환하면, 애플리케이션의 services.php 설정 파일에 등록된 Bot User OAuth 토큰과 연결된 워크스페이스의 #support-channel 채널로 알림이 전송됩니다:
<?php

namespace App\Models;

use Illuminate\Foundation\Auth\User as Authenticatable;
use Illuminate\Notifications\Notifiable;
use Illuminate\Notifications\Notification;

class User extends Authenticatable
{
    use Notifiable;

    /**
     * Slack 채널에 대한 알림 라우팅 정보를 반환합니다.
     */
    public function routeNotificationForSlack(Notification $notification): mixed
    {
        return '#support-channel';
    }
}
외부 Slack 워크스페이스로 알림 보내기
NOTE
외부 Slack 워크스페이스로 알림을 보내기 전에, Slack App이 반드시 배포되어 있어야 합니다.
애플리케이션을 운영하다 보면 사용자가 소유한 Slack 워크스페이스로 알림을 보내야 하는 경우가 많습니다. 이를 위해서는 먼저 해당 사용자의 Slack OAuth 토큰을 발급받아야 합니다. 다행히 Laravel Socialite에는 Slack 드라이버가 포함되어 있어, 사용자를 Slack으로 손쉽게 인증하고 봇 토큰을 발급받을 수 있습니다.
봇 토큰을 발급받아 애플리케이션 데이터베이스에 저장했다면, SlackRoute::make 메서드를 사용해 해당 사용자의 워크스페이스로 알림을 라우팅할 수 있습니다. 또한 대부분의 경우 사용자가 알림을 받을 채널을 직접 지정할 수 있도록 UI를 제공하는 것이 좋습니다:
<?php

namespace App\Models;

use Illuminate\Foundation\Auth\User as Authenticatable;
use Illuminate\Notifications\Notifiable;
use Illuminate\Notifications\Notification;
use Illuminate\Notifications\Slack\SlackRoute;

class User extends Authenticatable
{
    use Notifiable;

    /**
     * Slack 채널에 대한 알림 라우팅 정보를 반환합니다.
     */
    public function routeNotificationForSlack(Notification $notification): mixed
    {
        return SlackRoute::make($this->slack_channel, $this->slack_token);
    }
}
알림 지역화(Localization)
Laravel에서는 현재 HTTP 요청의 로케일과 다른 언어로 알림을 보낼 수 있습니다. 알림이 큐에 등록되는 경우에도 지정한 로케일 정보가 그대로 유지되어, 큐에서 실제로 처리될 때 해당 언어로 발송됩니다.
이를 위해 Illuminate\Notifications\Notification 클래스는 원하는 언어를 지정할 수 있는 locale 메서드를 제공합니다. 알림이 평가(evaluate)되는 시점에 애플리케이션의 로케일이 지정한 언어로 일시적으로 전환되고, 평가가 끝나면 원래 로케일로 다시 복원됩니다.
$user->notify((new InvoicePaid($invoice))->locale('es'));여러 수신자(notifiable)에게 한꺼번에 알림을 보낼 때도 Notification 파사드를 통해 동일하게 로케일을 지정할 수 있습니다.
Notification::locale('es')->send(
    $users, new InvoicePaid($invoice)
);
사용자별 선호 로케일 사용하기
애플리케이션에서 사용자마다 선호하는 언어(로케일)를 별도로 저장해 관리하는 경우가 많습니다. 이런 경우 알림 수신자(notifiable) 모델에 HasLocalePreference 계약(contract)을 구현해두면, Laravel이 알림을 보낼 때 저장된 로케일 값을 자동으로 사용하도록 만들 수 있습니다.
use Illuminate\Contracts\Translation\HasLocalePreference;

class User extends Model implements HasLocalePreference
{
    /**
     * 사용자가 선호하는 로케일을 반환합니다.
     */
    public function preferredLocale(): string
    {
        return $this->locale;
    }
}
이 인터페이스를 구현해두면 Laravel은 해당 모델에게 알림이나 메일을 보낼 때 자동으로 선호 로케일을 사용합니다. 따라서 이 인터페이스를 사용하는 경우에는 별도로 locale 메서드를 호출할 필요가 없습니다.
$user->notify(new InvoicePaid($invoice));NOTE
locale 메서드로 명시적으로 로케일을 지정한 경우, HasLocalePreference 인터페이스로 설정된 선호 로케일보다 우선 적용됩니다. 즉, 특정 알림 하나만 다른 언어로 보내고 싶을 때는 locale 메서드로 개별 지정하면 됩니다.
알림
테스트
Notification 파사드의 fake 메서드를 사용하면 실제로 알림이 발송되는 것을 막을 수 있습니다. 대부분의 경우 알림 발송 자체는 테스트하려는 로직과 직접적인 관련이 없으므로, "라라벨이 해당 알림을 보내도록 지시받았는지"만 검증하면 충분합니다.
Notification 파사드의 fake 메서드를 호출한 뒤에는, 특정 사용자에게 알림이 발송되도록 지시되었는지 검증할 수 있고, 알림이 전달받은 데이터까지도 확인할 수 있습니다.
Pest
<?php

use App\Notifications\OrderShipped;
use Illuminate\Support\Facades\Notification;

test('orders can be shipped', function () {
    Notification::fake();

    // 주문 배송 처리 로직 실행...

    // 아무 알림도 발송되지 않았는지 확인...
    Notification::assertNothingSent();

    // 주어진 사용자에게 알림이 발송되었는지 확인...
    Notification::assertSentTo(
        [$user], OrderShipped::class
    );

    // 알림이 발송되지 않았는지 확인...
    Notification::assertNotSentTo(
        [$user], AnotherNotification::class
    );

    // 알림이 두 번 발송되었는지 확인...
    Notification::assertSentTimes(WeeklyReminder::class, 2);

    // 특정 사용자에게 알림이 정확히 한 번 발송되었는지 확인...
    Notification::assertSentToOnce($user, OrderShipped::class);

    // 지정한 개수만큼 알림이 발송되었는지 확인...
    Notification::assertCount(3);
});
PHPUnit
<?php

namespace Tests\Feature;

use App\Notifications\OrderShipped;
use Illuminate\Support\Facades\Notification;
use Tests\TestCase;

class ExampleTest extends TestCase
{
    public function test_orders_can_be_shipped(): void
    {
        Notification::fake();

        // 주문 배송 처리 로직 실행...

        // 아무 알림도 발송되지 않았는지 확인...
        Notification::assertNothingSent();

        // 주어진 사용자에게 알림이 발송되었는지 확인...
        Notification::assertSentTo(
            [$user], OrderShipped::class
        );

        // 알림이 발송되지 않았는지 확인...
        Notification::assertNotSentTo(
            [$user], AnotherNotification::class
        );

        // 알림이 두 번 발송되었는지 확인...
        Notification::assertSentTimes(WeeklyReminder::class, 2);

        // 특정 사용자에게 알림이 정확히 한 번 발송되었는지 확인...
        Notification::assertSentToOnce($user, OrderShipped::class);

        // 지정한 개수만큼 알림이 발송되었는지 확인...
        Notification::assertCount(3);
    }
}assertSentTo나 assertNotSentTo 메서드에 클로저를 전달하면, 주어진 "판별 조건"을 통과하는 알림이 발송되었는지 확인할 수 있습니다. 판별 조건을 통과하는 알림이 하나라도 있으면 해당 검증은 성공합니다.
Notification::assertSentTo(
    $user,
    function (OrderShipped $notification, array $channels) use ($order) {
        return $notification->order->id === $order->id;
    }
);
NOTE
실무에서는 단순히 알림이 발송되었는지만 확인하기보다, 이렇게 클로저로 알림 내부 데이터(주문 ID, 금액 등)까지 검증하는 편이 더 견고한 테스트가 됩니다. 알림 클래스의 필드명이 바뀌는 실수를 조기에 잡아낼 수 있기 때문입니다.
온디맨드 알림 테스트
테스트 대상 코드가 온디맨드 알림을 발송한다면, assertSentOnDemand 메서드를 사용해 해당 온디맨드 알림이 발송되었는지 검증할 수 있습니다.
Notification::assertSentOnDemand(OrderShipped::class);
Notification::assertSentOnDemandOnce(OrderShipped::class);
assertSentOnDemand 메서드의 두 번째 인자로 클로저를 전달하면, 온디맨드 알림이 올바른 "라우트" 주소로 발송되었는지까지 판별할 수 있습니다.
Notification::assertSentOnDemand(
    OrderShipped::class,
    function (OrderShipped $notification, array $channels, object $notifiable) use ($user) {
        return $notifiable->routes['mail'] === $user->email;
    }
);
알림 이벤트
알림 전송 중(Sending) 이벤트
알림이 전송될 때 알림 시스템은 Illuminate\Notifications\Events\NotificationSending 이벤트를 발생시킵니다. 이 이벤트에는 "notifiable" 엔티티와 알림 인스턴스 자체가 포함되어 있습니다. 애플리케이션에서 이 이벤트를 위한 이벤트 리스너를 만들 수 있습니다:
use Illuminate\Notifications\Events\NotificationSending;

class CheckNotificationStatus
{
    /**
     * 이벤트를 처리합니다.
     */
    public function handle(NotificationSending $event): void
    {
        // ...
    }
}
NotificationSending 이벤트에 대한 이벤트 리스너의 handle 메서드가 false를 반환하면 해당 알림은 전송되지 않습니다:
/**
 * 이벤트를 처리합니다.
 */
public function handle(NotificationSending $event): bool
{
    return false;
}
이벤트 리스너 내부에서는 이벤트의 notifiable, notification, channel 속성에 접근하여 알림 수신자나 알림 자체에 대한 더 자세한 정보를 확인할 수 있습니다:
/**
 * 이벤트를 처리합니다.
 */
public function handle(NotificationSending $event): void
{
    // $event->channel
    // $event->notifiable
    // $event->notification
}
알림 전송 완료(Sent) 이벤트
알림이 전송되고 나면 알림 시스템은 Illuminate\Notifications\Events\NotificationSent 이벤트를 발생시킵니다. 이 이벤트 역시 "notifiable" 엔티티와 알림 인스턴스 자체를 포함합니다. 애플리케이션에서 이 이벤트를 위한 이벤트 리스너를 만들 수 있습니다:
use Illuminate\Notifications\Events\NotificationSent;

class LogNotification
{
    /**
     * 이벤트를 처리합니다.
     */
    public function handle(NotificationSent $event): void
    {
        // ...
    }
}
이벤트 리스너 내부에서는 이벤트의 notifiable, notification, channel, response 속성에 접근하여 알림 수신자나 알림 자체에 대한 더 자세한 정보를 확인할 수 있습니다:
/**
 * 이벤트를 처리합니다.
 */
public function handle(NotificationSent $event): void
{
    // $event->channel
    // $event->notifiable
    // $event->notification
    // $event->response
}
NOTE
이 이벤트들을 활용하면 알림 발송 여부를 조건에 따라 제어하거나(NotificationSending), 발송된 알림 이력을 로그로 남기는(NotificationSent) 등의 부가 기능을 알림 클래스 자체를 수정하지 않고도 손쉽게 추가할 수 있습니다. 예를 들어 특정 사용자가 알림 수신을 차단(옵트아웃)했는지 확인해 전송을 취소하는 로직을 NotificationSending 리스너에 구현하면, 알림을 발송하는 모든 코드를 일일이 수정할 필요가 없습니다.
커스텀 채널
Laravel은 몇 가지 알림 채널을 기본으로 제공하지만, 다른 채널을 통해 알림을 전송하기 위한 나만의 드라이버를 작성하고 싶을 수도 있습니다. Laravel에서는 이 작업도 간단합니다. 시작하려면 send 메서드를 포함하는 클래스를 정의하면 됩니다. 이 메서드는 $notifiable과 $notification이라는 두 개의 인자를 받습니다.
send 메서드 안에서는 알림 객체의 메서드를 호출해 해당 채널이 이해할 수 있는 메시지 객체를 가져온 다음, 원하는 방식으로 $notifiable 인스턴스에 알림을 전송하면 됩니다:
<?php

namespace App\Notifications;

use Illuminate\Notifications\Notification;

class VoiceChannel
{
    /**
     * 주어진 알림을 전송합니다.
     */
    public function send(object $notifiable, Notification $notification): void
    {
        $message = $notification->toVoice($notifiable);

        // $notifiable 인스턴스에 알림을 전송합니다...
    }
}
알림 채널 클래스를 정의했다면, 알림 클래스의 via 메서드에서 해당 클래스명을 반환하면 됩니다. 아래 예시에서 알림 클래스의 toVoice 메서드는 음성 메시지를 표현하기 위해 원하는 형태의 객체를 자유롭게 반환할 수 있습니다. 예를 들어, 이런 메시지를 표현하기 위한 VoiceMessage라는 클래스를 직접 정의할 수도 있습니다:
<?php

namespace App\Notifications;

use App\Notifications\Messages\VoiceMessage;
use App\Notifications\VoiceChannel;
use Illuminate\Bus\Queueable;
use Illuminate\Contracts\Queue\ShouldQueue;
use Illuminate\Notifications\Notification;

class InvoicePaid extends Notification
{
    use Queueable;

    /**
     * 알림 채널을 가져옵니다.
     */
    public function via(object $notifiable): string
    {
        return VoiceChannel::class;
    }

    /**
     * 알림의 음성 표현을 가져옵니다.
     */
    public function toVoice(object $notifiable): VoiceMessage
    {
        // ...
    }
}
NOTE
커스텀 채널을 만들 때는 send 메서드 안에서 실제 전송 로직(예: 외부 API 호출, SDK 사용 등)을 자유롭게 구현할 수 있습니다. 이렇게 만든 채널 클래스는 애플리케이션 어디서든 재사용할 수 있으며, 필요하다면 패키지로 분리해 배포할 수도 있습니다.